I used black cardstock, CTMH Scaredy Cat paper pack, black and orange ribbon, and some alcohol markers to color the monsters in! Overall it was pretty simple to make ... just a bit time consuming! :)
Tuesday, September 16, 2014
Halloween Frightfully Fun Card
I joined an anything goes card swap that's due this weekend so I decided to take my new cute CTMH Frightfully Fun stamp set to make a Halloween card! I took inspiration from the DAT's My Style Blog.
Labels:
bat,
black,
card,
close to my heart,
ctmh,
frightfully fun,
ghost,
goblin,
halloween,
mummy,
orange,
scaredy cat
Wednesday, September 3, 2014
Elegant Happy Birthday
I recently participated in a Happy Birthday card swap. I was online looking for inspiration as I often do when I cam across Lisa's Creative Corner Jubilee Boxed Card Set. What can I say? I was inspired!
I used the CTMH Art Philosophy cricut cartridge to cut the flowers and used honey ink to sponge the edges of the flower. It really makes the flower pop. I highly encourage those that haven't tried to sponge the edges of your flowers to do so!
The yellow paper is from the Close to my Heart Jubilee paper pack, and the Happy Birthday is stamped in Chocolate ink.
I used a non-CTMH embossing folder just because it had the line in it to make a border where my sentiment could go.
Overall, it was pretty easy to make, and I just love the whole set that Lisa put together. I may have to do more!
Labels:
art philosophy,
birthday,
chocolate,
close to my heart,
ctmh,
daisy,
embossing,
flower,
honey,
jubilee,
yellow
Wednesday, August 20, 2014
Simple Birthday Cards
I've had several people tell me they aren't creative enough to make birthday cards. Impossible! You don't have to make your cards as extravagant as some make theirs in order to have a really cute card to send out instead of going to your local Hallmark and buying something. I have two examples of simple cards that I think are really cute!
This first one is just pink paper folded over with a cute polka dot paper background. I then cut the shape out with Close To My Heart's Art Philosophy Cricut Cartridge ... one pink and one white. I stamped Happy Birthday with a stamp from Close To My Heart's Art Philosophy Cricut Collection Birthday stamp set. I used silver shimmer trim I bought at Target for $1. That's it! Card is DONE!
The second card is VERY similar to the first one. I used a different color pink paper folded over with a pink and gray striped background paper this time. I decided I didn't want to get my cricut out so I just cut squares and used the handy corner rounder to make it softer. I stamped a cupcake stamp that I got from Michael's and colored it in with watercolor pencils. I used the same cheap shimmer trim, corner rounded the edges of the card itself, and I called it done!
ANYONE can make simple cute cards ... I think I just proved it! :)
Labels:
art philosophy,
birthday,
ctmh,
cupcake,
girly,
happy birthday,
pink,
polka dot,
striped
Wednesday, July 9, 2014
Surf's Up Birthday Card
Just like normal, I waited until the last minute to get a project done ... ONE of these days, I'll be ahead of schedule! I always have big plans, but then time just gets away from me!
For my July workshop, I put together this cute little birthday card using Close To My Heart's Surf's Up paper that I've had for a while. I found a section of that paper that didn't have words or people on it so I wouldn't have bits of that sticking out from behind the sentiment! I put turquoise paper behind it - otherwise, it didn't look right next to the white card.
The brown strip is just the reverse side of the Surf's Up paper I used. The red/pink paper was actually a fuzzy piece I found in my stash - I don't remember where I got it! I've probably had it for quite some time ... I have a problem buying paper.
I used Close To My Heart's "Heartfelt Birthday Wish" mini stamp (only $2.95!) and used an alcohol marker to color it in ... I'm not sure the color I chose was JUST right, but it'll do! That's the first time I've used those markers!
I then thought it needed some bling. SO - I pulled out the Close To My Heart "Hooray Bouquet" set and stamped a flower. Then yes, I fussy cut out that flower, adhered it to my card, and flipped up the petals a little to give it dimension. I couldn't find my foam tape, or I would have popped up the whole flower!
I had some gems to make it sparkle, stamped the "May this year be your grandest year yet" sentiment (from the Hooray Bouquet set) on the inside and called it a night!
If you're interested in any of the products used, check out my shopping site: http://beckyo.ctmh.com
What do you think? I'd love to get some comments! I'm sure there are other suggestions for upping the difficulty level on my cards!
For my July workshop, I put together this cute little birthday card using Close To My Heart's Surf's Up paper that I've had for a while. I found a section of that paper that didn't have words or people on it so I wouldn't have bits of that sticking out from behind the sentiment! I put turquoise paper behind it - otherwise, it didn't look right next to the white card.
The brown strip is just the reverse side of the Surf's Up paper I used. The red/pink paper was actually a fuzzy piece I found in my stash - I don't remember where I got it! I've probably had it for quite some time ... I have a problem buying paper.
I used Close To My Heart's "Heartfelt Birthday Wish" mini stamp (only $2.95!) and used an alcohol marker to color it in ... I'm not sure the color I chose was JUST right, but it'll do! That's the first time I've used those markers!
I then thought it needed some bling. SO - I pulled out the Close To My Heart "Hooray Bouquet" set and stamped a flower. Then yes, I fussy cut out that flower, adhered it to my card, and flipped up the petals a little to give it dimension. I couldn't find my foam tape, or I would have popped up the whole flower!
I had some gems to make it sparkle, stamped the "May this year be your grandest year yet" sentiment (from the Hooray Bouquet set) on the inside and called it a night!
If you're interested in any of the products used, check out my shopping site: http://beckyo.ctmh.com
What do you think? I'd love to get some comments! I'm sure there are other suggestions for upping the difficulty level on my cards!
Tuesday, June 17, 2014
Happy Father's Day!
I hope everyone had a great father's day weekend. Ours was full with a cookout at my parents' house and going to Texas Roadhouse with the in-laws! Was a good time all around!
For Father's Day, I made this card for both fathers in our lives. I had just gotten the Martha Stewart ribbon loop punch around the page punch set Friday night so I had to incorporate that somehow!
Thursday, June 5, 2014
Announcing a new Panstoria Affliliate!
A friend of mine recently signed up to be an affiliate for Panstoria. Panstoria is the company that took over Creative Memories' digital line. They're actually the company that created StoryBook Creator and Memory Manager from the beginning! Let's help Amanda out by buying some new content ... they've got a 25% off sale on all digital content. I know most of us haven't bought anything new in a while since Creative Memories gave Storybook up!
Don't forget that Panstoria digital kits are compatible with your Creative Memories Storybook Creator software ... you don't have to upgrade to Artisan until you're ready!
All digital content kits in the store are 25% off their original prices. Nearly 2,000 items in the store can be purchased for 25% off, including some of your CM favorites, and lots and lots of new ones!
Sale runs through Friday, June 13 at 2:00 PM Pacific Time, so be sure to order quick:
Browse Panstoria Digital Content
P.S. - Amanda will be contributing to this blog with guest posts from time to time to give us some digital inspiration! I've included a Panstoria badge to the side along with the CTMH badge for quick access!
Don't forget that Panstoria digital kits are compatible with your Creative Memories Storybook Creator software ... you don't have to upgrade to Artisan until you're ready!
All digital content kits in the store are 25% off their original prices. Nearly 2,000 items in the store can be purchased for 25% off, including some of your CM favorites, and lots and lots of new ones!
Sale runs through Friday, June 13 at 2:00 PM Pacific Time, so be sure to order quick:
Browse Panstoria Digital Content
P.S. - Amanda will be contributing to this blog with guest posts from time to time to give us some digital inspiration! I've included a Panstoria badge to the side along with the CTMH badge for quick access!
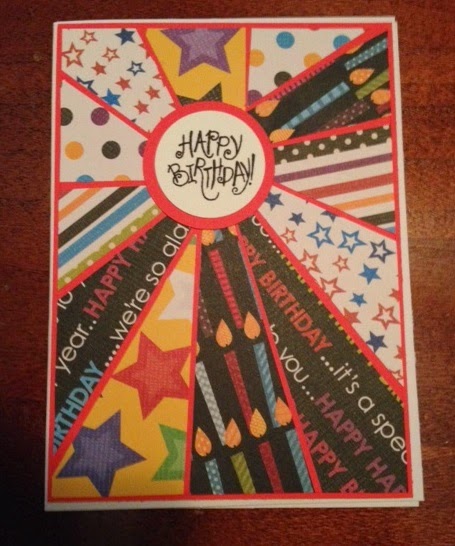
Starburst Birthday Cards
Saturday night I worked on a couple of birthday cards. I'd seen an example with measurements on Pinterest and thought ... I can do that! I picked out 6 different pieces of paper that went together. Okay, so I'm not sure mine all matched, but I felt they were all either birthday or celebration paper!
You were to cut out 6 rectangles:
4.5 x 1.5
4 x 1.5
3 x 1.5
3 x 1.5
2 x 1.5
2 x 1.5
Then each of these you cut into triangles, cutting from corner to opposite corner. You then position them around the paper you're mounting them to as you see fit ... they'll hang off the edges, and that's okay. Once they're glued down how you like, you can cut around the square to get the starburst effect.
I then cut out a circle and used an old Creative Memories stamp that fit in the circle.
Here's my first attempt:
I liked it, but I thought it might look cute if I had a border all the way around it, not just white edges.
What do you think?
You were to cut out 6 rectangles:
4.5 x 1.5
4 x 1.5
3 x 1.5
3 x 1.5
2 x 1.5
2 x 1.5
Then each of these you cut into triangles, cutting from corner to opposite corner. You then position them around the paper you're mounting them to as you see fit ... they'll hang off the edges, and that's okay. Once they're glued down how you like, you can cut around the square to get the starburst effect.
I then cut out a circle and used an old Creative Memories stamp that fit in the circle.
Here's my first attempt:
I liked it, but I thought it might look cute if I had a border all the way around it, not just white edges.
What do you think?
Subscribe to:
Posts (Atom)